
I bought this packet of 8 in our tesco express just a few days ago, and i manged to go through a whole packet tonight!!
There is 8 in a box :|
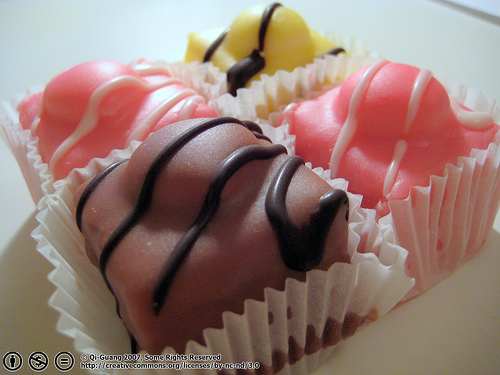
Mind you, the ones i bought were called "Frosty Fancies" theses ones were white.. and mmmmm they were sooo scrummy!!!
Only problem i find with them, sometimes, is that they get very sickly after a while! =) But i loves them nevertheless! teehee
So, after eating a box.. and realizing that Mr Kiplings French Fancies are kind of expensive - sometimes - i bought for £1 in Tesco, as i mentioned before...
So, i looked on line, googled french fancies recipe and i think i got one...
"4 packets Asda Smart Price sponge mixture (4 at 27p each)
4 eggs (94p for 6 = about 60p)
150g butter (£1.36 for 500g = about 50p)
Icing sugar (in the store cupboard – no idea)
A bit of jam (again, going spare in the cupboard)
Vanilla essence (that cupboard really needs a sort out)
3 packets of Asda smart price ready to roll white icing (3 at 48p each)
Pink food colouring (31p)
White writing icing (£1.24)
Asda fondant fancies to dissect, and then devour (98p)
Directions
1. After doing a straw poll amongst friends and relatives, the most important features of a French fancy are – a. they’re a cube, b. they have a lump of some as yet undefined squishy stuff on the top, and c. they come in 3 colours.
2. As a Frugal Pimper (as opposed to a Blinging Pimper) I shopped at Asda, and chose mainly Smart Price items. I could have made sponge cake using flour, sugar and so on, but at 27p a packet, and promising to make 2 6 inch sponge cakes, this seemed the most cost effective way. I’m also quite lazy, so I made all 4 packets up with 4 eggs and the right amount of water in a food processor.
3. As we’ve discussed, the proper fancy is a perfect cube, so a lot of time was spent trying to work out how to make a cube shaped cake. A square cake tin would have been the obvious way to go, but being forgetful (as well as frugal and lazy… god, I’m such a catch) I realised when I got home I’d only got round tins. After discussing whether it would be more ‘pimp’ to make a round fancy, we decided this was a cop-out, and I rose to the challenge.
4. To make a square cake, I had to resort to meat roasting tins lined with tin foil. As these were rectangular, it would need some cutting and pasting later on, but that is what all my years at school studying home economics and physics were surely for.
5. So once the tins were ready, the mixture was whipped, and the oven was pre-heated, the only thing left to do was bake it. Once baked, I left them to cool on some racks, while I thought about how to make a cube
6. While they cooled, I started on making the icing. I chose pink, as the only writing icing I could find was either black or white, and looking at the packet, the only white iced fancy was pink. Logic, you see.
7. Mash the icing with some of the pink food colouring. No idea of the amount I used, but it was very messy, and I ended up with hands like a serial killer for days.
8. After sampling a couple of the fancies (and getting a bit hyper, which reminded me why I steer clear of cake usually…) the creamy stuff seemed to be buttercream, and the packaging stated it was vanilla flavoured. After looking in my trusty Good Housekeeping recipe book, written before I was born and passed down by my dear old Mum, I found a recipe. Would you believe it, buttercream is nothing more than icing sugar and butter. Astonishing. As I couldn’t be bothered waiting for the butter to get soft, I microwaved it for a few seconds, then stirred in the icing sugar, after sieving of course. I then added a bit of vanilla essence for good measure.
9. The trouble with baking cakes in meat tins lined with tin foil, is that they don’t come out very easily. Well, actually, that might have something to do with the fact I forgot to grease the tin foil. Whatever happened, they needed sticking together with some of the creamy icing. I then transferred it onto a board, and cobbled together a cube by sticking bits here and there with sugar free (for the health conscious amongst you) jam. By the end of it, it looked like Frankenstein’s Monstercake.
10. I then dolloped the cream on the top in a big round mound, shaping it with the greatest care as it was already a bit top heavy.
11. By this time, I was beginning to see just how gargantuan this cake was, and was beginning to wonder if I had enough icing. After rolling it out, I could see it was big enough, but couldn’t quite see how to get it on the cake. Taking a deep breath, I folded it over the rolling pin, and dropped it on the cake. Amazingly, it worked, until I realised I’d forgotten the apricot jam to hold it on. Oh well, after a bit of fiddling and trimming off the excess, it looked okay.
12. The final touch was, of course, the lines of white icing going over the fancy. This was pretty easy, as I bought icing already in a tube.
13. As you can see in the comparison shot, it’s about 100 times the size, but still has the trademark lumpy top. The cross section does unfortunately show the lines of jam, but you could argue, as I did to my brother-in-law, that it’s just that little bit more fancy.
14. BUT that’s not all – with the leftover cake, buttercream and icing I didn’t want to waste, I made a sort of stretch French fancy by cutting open the cake, filling it with cream, covering it with icing and piping over some go faster stripes. It tasted pretty good, and was definitely easier to eat than the other one."
Not too bad, it even tells you where to get it, and how much you can make them for!! probably cost more to make, but at least your get a lot more to eat, other than 8 small squares of heaven *drools..*
No comments:
Post a Comment